In this comprehensive guide, we will walk you through the step-by-step process of assembling and optimizing the innovative RRP steering system on your handlepole. Whether you ride a Kawasaki, Yamaha SuperJet, Sea-Doo, or any other standup watercraft, this guide is tailored to help you achieve ultimate control and precision. So, let's dive in and explore the realm of RRP steering systems, handlebars, billet components, chin pads, and more.
The RRP steering system, renowned for its superior performance, brings unrivaled control to your watercraft. With its adjustable features and lightweight construction, this billet aluminum system takes your freeride experience to new heights. From Kawasaki SX-R to Yamaha SuperJet and beyond, the RRP steering system proves its versatility across various watercraft models.
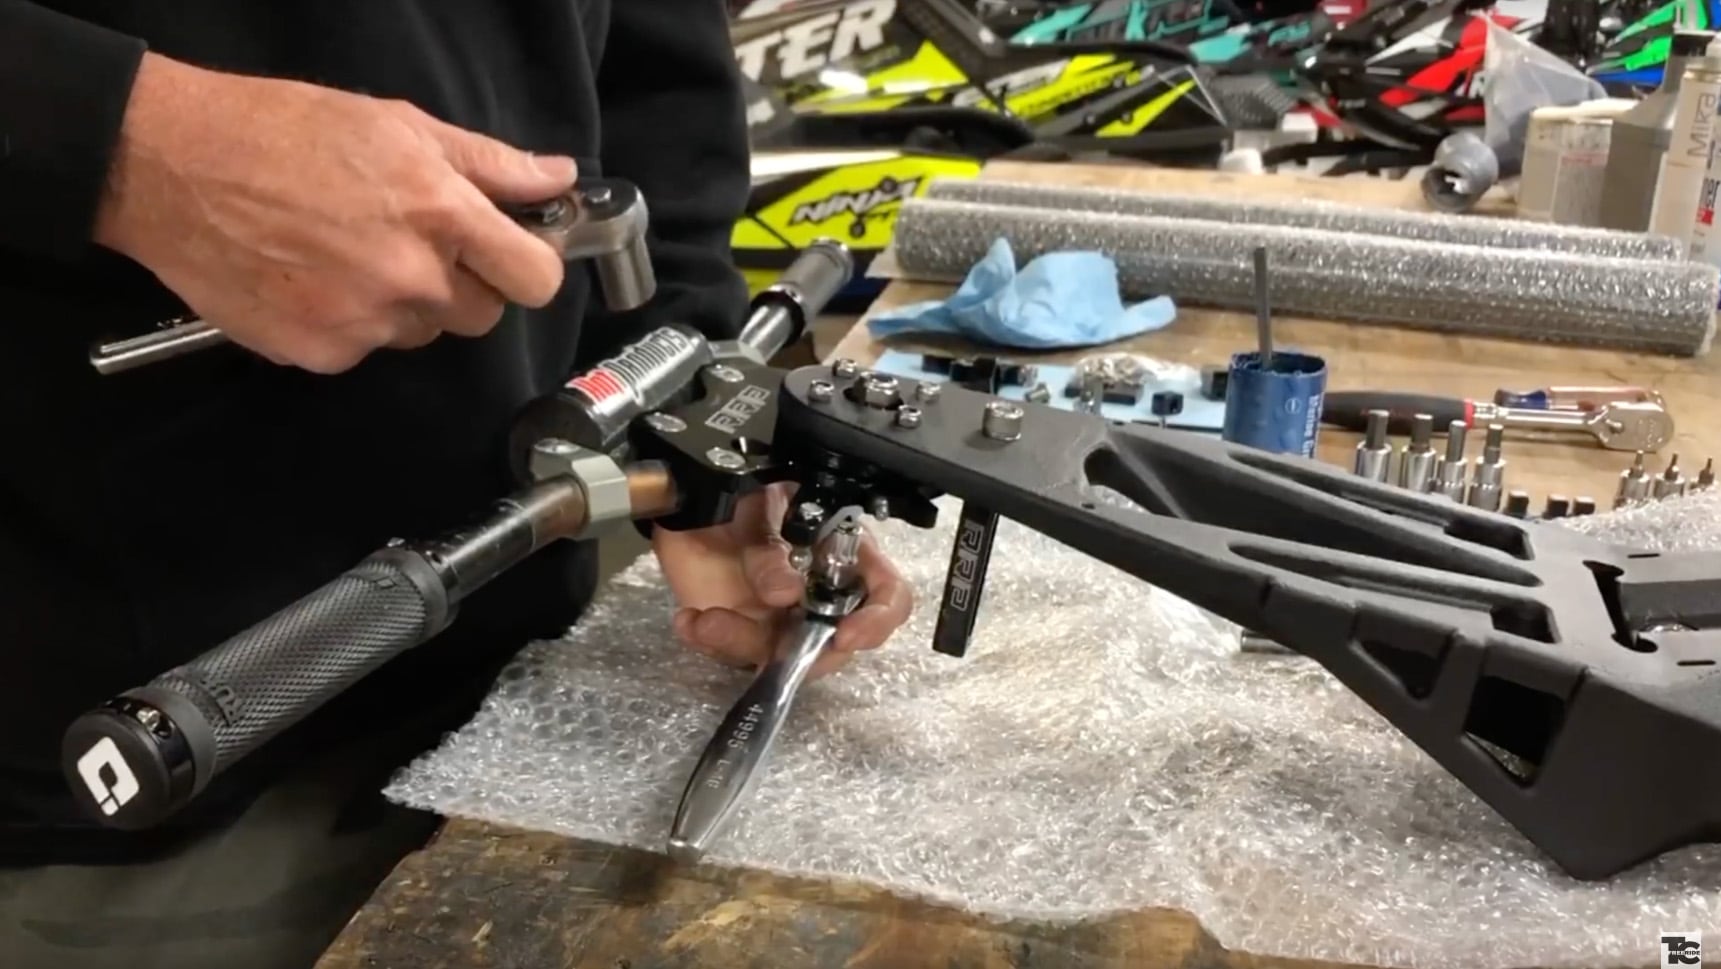
Step 1: Attaching the Steering Plate
Begin by placing the steering plate onto the handlepole. Use bolts with waterproof grease applied to the threads for enhanced durability. Tighten the bolts using a ten-millimeter socket. The handlepole serves as the foundation for your steering system. By utilizing precision-engineered components from reputable brands like Blowsion, ODI, and RRP, you can optimize the handlepole's performance. Explore aftermarket handlepole springs, pivot bolts, throttle levers, and pivot points to fine-tune your watercraft's handling and responsiveness.
Your choice of handlebars plays a crucial role in your riding experience. Consider RRP Fat Bar options or other ergonomic handlebars to find the perfect fit for your style. Combine them with high-quality grips from ODI or RRP for superior comfort, traction, and vibration reduction.
Step 2: Installing the O-Ring and Thrust Washers
In Step 2, we focus on the installation of the O-ring and thrust washers within your watercraft's steering system. These components play a crucial role in ensuring a tight seal and reducing friction, ultimately enhancing the overall performance and longevity of your system. Let's delve into the process:
Prepare the O-ring: Before installation, inspect the O-ring to ensure it is in good condition, free from any damage or deformation. This ensures an effective seal within the steering system.
Locate the groove: Identify the groove on the steering plate where the O-ring will be placed. The groove is specifically designed to securely hold the O-ring in place.
Position the O-ring: Carefully place the O-ring into the groove, ensuring it sits evenly and snugly. Take care not to stretch or pinch the O-ring during this process, as it may compromise its integrity.
Prepare the thrust washers: Before installation, apply a light coat of grease to both sides of the thrust washers. This lubrication minimizes friction and facilitates smooth movement within the steering system.
Place the first thrust washer: Position one of the thrust washers onto the designated slot or location within the assembly. The thrust washer acts as a barrier between the components, reducing friction and wear.
Grease the second thrust washer: Apply a light coat of grease to one side of the second thrust washer, ensuring even coverage. This lubrication promotes smooth rotation and minimizes friction during operation.
Install the second thrust washer: Place the greased side of the second thrust washer against the first thrust washer or in the designated position within the assembly. This establishes a smooth surface for rotation and reduces friction between the washers.
By installing the O-ring and thrust washers correctly, you create a tight seal, preventing water ingress and minimizing friction within the steering system. This enhances the overall performance and durability of your watercraft.
Step 3: Mounting the Thrust Bearing
In Step 3, we focus on mounting the thrust bearing, a critical component that contributes to the stability and efficiency of your watercraft's steering system. By properly installing the thrust bearing, you ensure smooth and reliable steering performance. Let's dive into the process:
Prepare the thrust bearing: Before mounting the thrust bearing, ensure it is clean and free from any debris or contaminants. This promotes optimal functionality and longevity.
Apply lubrication: To minimize friction and ensure smooth operation, apply a thin layer of grease to the surface of the thrust bearing. This lubrication facilitates seamless movement within the steering system.
Locate the first washer: Identify the first washer that will be placed between the thrust bearing and the steering system assembly. It serves as a spacer and provides additional support to the bearing.
Grease the first washer: Apply a light coat of grease to one side of the first washer. This lubrication aids in reducing friction between the washer and the adjacent components.
Position the first washer: Place the greased side of the first washer against the thrust bearing, ensuring proper alignment. This creates a smooth interface between the bearing and the washer.
Grease the thrust bearing: Apply grease to the surface of the thrust bearing, ensuring thorough coverage. This lubrication reduces wear and tear while promoting fluid steering movement.
Add the second washer: Following the thrust bearing, position the second washer. Similar to the first washer, apply a light coat of grease to one side before placing it in the assembly.
By mounting the thrust bearing correctly, you enhance the stability and efficiency of your watercraft's steering system. The thrust bearing allows for smooth rotation and minimizes resistance, resulting in precise and responsive steering control.
Step 4: Adding the Term Plate
Ensure that the white line on the front of the term plate aligns with the white line on the steering system. Apply a light coat of grease to the washer and bearing on the term plate. Thoroughly grease the needle bearing and add a small amount of grease to the washer. Now, you can attach the billet cap by greasing the O-ring and tightening the six-millimeter bolt.
Upgrade your steering system with RRP's billet components for enhanced durability and precision. From billet chin pads that offer clearance for the steering cable to anodized billet adapters that ensure a secure fit, these components are designed to elevate your control and confidence on the water.
Step 5: Adjusting the Tension
Once the handlebars are in place, it's time to adjust the tension of the steering system. Locate the nut on the bottom side and tighten it using a 17-millimeter socket. Start by loosely securing the nut and later adjust the tension after the handlebars are fully installed.
The steering cable and turnplate are critical components of your watercraft's steering mechanism. Ensure optimal performance by utilizing high-quality RRP steering cables, greaseable turnplates, and precision-adjustable tension to achieve the desired responsiveness.
Step 6: Ensuring Stability and Lubrication - Securing the Steering Arm and Zerk Fitting
In Step 6, we focus on securing the steering arm and the corresponding Zerk fitting, which plays a crucial role in maintaining stability and lubrication within your watercraft's steering system. Properly securing these components ensures a smooth and responsive steering experience. Let's delve into the process:
Determine the steering arm position: Before proceeding, identify whether your watercraft model, such as Kawasaki or Yamaha SuperJet, requires the steering arm to be mounted on the left or right side. This positioning may vary based on the specific make and model of your watercraft.
Apply thread-locking agent: To ensure a secure connection, apply a thread-locking agent, such as red Loctite, to the bolts that will secure the steering arm. This helps prevent them from loosening due to vibrations during operation.
Mount the steering arm: Align the steering arm with the designated mounting points on the handlepole or the steering system assembly. Insert the bolts through the corresponding holes, ensuring they are fully threaded.
Tighten the bolts: Using the appropriate socket wrench or spanner, gradually tighten the bolts. Apply controlled force to securely fasten the steering arm while avoiding over-tightening, which may cause damage to the components.
Locate the Zerk fitting: The Zerk fitting serves as a lubrication point within the steering system. Typically, it is positioned on the opposite side of the steering arm. Identify its location, ensuring it aligns with the designated slot on the universal steering kit.
Attach the Zerk fitting: Carefully position the Zerk fitting in the designated slot and ensure a proper fit. Take care not to overtighten the fitting, as it could result in damage or restricted lubrication.
Snug the fitting: Using a seven-millimeter socket, gently tighten the Zerk fitting to provide a secure connection. Avoid excessive force, as it may compromise the fitting's integrity.
Securing the steering arm and Zerk fitting is essential for maintaining stability and facilitating proper lubrication within your watercraft's steering system. By adhering to these steps, you ensure a solid and reliable connection, minimizing the risk of loosening or malfunction during your rides.
Step 7: Setting the Term Plates for Handlebars
Take note that the term plates can accommodate straight bars or four-degree handlebars. Choose the appropriate setting and ensure that the bolts are evenly greased and tightened, maintaining an even gap between the clamps and term plate.
Fine-tune your watercraft's handling characteristics with aftermarket sponsons and ride plates. Brands like Worx, Riva, and AST offer an array of options designed to optimize stability, cornering, and overall performance for your specific watercraft model.
Step 8: Tightening the Big Nut and Checking for Slop
Once you have assembled the components of your RRP steering system, it's time to focus on achieving stability and precision in your watercraft's steering. Step 8 involves tightening the big nut and checking for any play or slop in the system. This ensures that your steering remains responsive and reliable during your freeride adventures. Here's how to proceed:
Locate the big nut: The big nut is typically positioned on the bottom side of the steering system, near the handlepole assembly. It secures the steering system in place, minimizing any unwanted movement or slack.
Begin tightening: Using an appropriate tool, such as a socket wrench or spanner, start tightening the big nut. Apply gradual and controlled force to ensure a secure fit without over-tightening, which could restrict the system's movement.
Assess for play or slop: After the initial tightening, check for any play or slop in the steering system. Gently move the handlebars from side to side, observing if there is any excess movement or looseness. Ideally, the steering system should feel tight and responsive, with minimal play.
Fine-tune the tension: If you notice any play or slop, further adjust the tension of the big nut until the desired stability is achieved. Incrementally tighten the nut while periodically checking for excessive play or constriction of movement. Strive for a balance between firmness and smooth maneuverability.
Verify the steering stop: While assessing the system's stability, also ensure that the steering stop, typically consisting of a large bolt, is securely fastened. Apply a reliable thread-locking agent, such as red Loctite, to the top side of the bolt for added security.
By tightening the big nut and minimizing play or slop, you enhance your watercraft's steering responsiveness and control. This step contributes to the overall stability and precision of your steering system, allowing you to navigate the water with confidence and agility.
Step 9: Using the Spacer for the Chin Pad
One essential aspect of optimizing your watercraft's steering system is ensuring proper clearance for the chin pad. In some cases, the design of the steering system may require additional space to raise the chin pad and prevent interference with the steering components. This is where the chin pad spacer comes into play.
The chin pad spacer serves as a simple yet effective solution to elevate the chin pad, providing the necessary clearance for unobstructed steering. By attaching this purpose-built spacer, you can maintain comfort while ensuring smooth and uninhibited control of your watercraft.
The installation process of the chin pad spacer is straightforward. Once you have assembled the RRP steering system according to the earlier steps, you can proceed with this final adjustment. Here's how to use the spacer effectively:
Position the chin pad spacer: Place the chin pad spacer in the designated area beneath the chin pad. It is specifically designed to lift the chin pad to the desired height.
Secure the chin pad spacer: Align the holes on the spacer with the corresponding holes on the watercraft's body or the chin pad itself. Ensure a proper fit and alignment before proceeding.
Fasten with the big bolt: Insert the appropriately sized bolt through the aligned holes of the spacer and the chin pad. Use the necessary tools to tighten the bolt securely, ensuring a stable connection between the spacer and the watercraft.
Step 10: Adjusting the Steering Ball
The positioning of the steering ball affects the turning speed of the ski. Adjusting it outward will result in quicker turns, while moving it inward slows down the turning. Find your preferred setting for optimal performance.
To keep your RRP steering system in peak condition, regular maintenance is essential. Explore rebuild kits that include gaskets, bushings, and other necessary components to ensure your steering system remains reliable for many exhilarating rides to come.
Conclusion
Congratulations! You are now equipped with the knowledge to assemble and optimize your watercraft's steering system using the remarkable RRP components. By combining the precision of billet aluminum, the adjustability of the RRP steering system, and the expertise of renowned brands, you can experience the ultimate freeride adventure. Unleash your watercraft's full potential and enjoy the thrill of unmatched control and performance on the waves. Keep exploring, upgrading, and pushing boundaries with TC Freeride and the extraordinary RRP steering system.